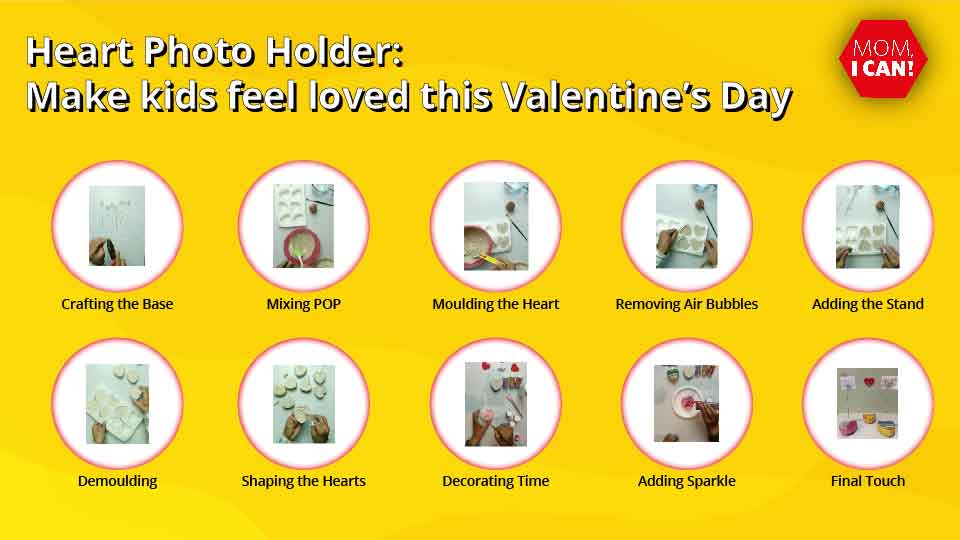
Valentinva, hearValentine’s Day isn’t just about grand gestures; it’s about the small, thoughtful moments that make love extraordinary. This step-by-step guide will walk you through creating a delightful Heart Photo Holder, a perfect craft for kids and adults alike. Let’s embark on this journey of love, creativity, and handmade joy.
Let’s create a photo holder craft for our loved ones and give them a present made with our own hands. Let’s start with the material you’ll need for creating this
DIY Heart Photo Holder Craft
Materials Needed:
The beauty of this craft lies in its simplicity. Gather these everyday items:
- A small piece of wire
- Pliers
- Plaster of Paris (POP)
- Water
- A plastic bowl
- A heart-shaped silicon mould
- Oil for greasing
- Paints in your favorite colors
- Glitter for that extra sparkle
- A blade for fine-tuning
- And of course, love notes to complete the magic.
Step 1: Crafting the Base
Imagine the joy of creating something special for your loved one. Take a small piece of wire, hold it in your hands, and with the help of pliers, give it life. Shape it into a spiral, a symbol of the infinite love you share. Form a loop at the other end, a loop of connection.
Step 2: Mixing POP
In a plastic bowl, feel the texture of the Plaster of Paris as you mix it with water. Let it be a tactile experience, finding the right consistency that will shape your creation.
Step 3: Moulding the Heart
Hold the heart-shaped silicon mould in your hands. Feel its smoothness. With care and attention, grease it with oil. Imagine the love you’re pouring into this mould.
Step 4: Removing Air Bubbles
As you tap and shake the mould gently, picture the air bubbles rising to the surface and dissipating. This is the love and care you infuse into every detail of your creation.
Step 5: Adding the Stand
Insert the spiral wire into the center of the mould. Feel the connection between the wire and the heart, a support system for your creation, just as your loved one is your support.
Step 6: Demoulding
As the mixture dries, demould the hearts carefully. Feel the sense of accomplishment as you unveil what you’ve created with your own hands.
Step 7: Shaping the Hearts
Hold the blade in your hands, and with precision, scrape and file the POP heart. Feel the transformation from raw material to a refined creation.
Step 8: Decorating Time
Now, the canvas is yours. Pick up the paintbrush, dip it into the colors of your choice, and let your imagination run wild. Feel the freedom of expression as you decorate your hearts.
Step 9: Adding Sparkle
The glitter is like stardust, enhancing the magic of your creation. Sprinkle it on with the same joy and enthusiasm you feel when love sparkles in your eyes.
Step 10: Final Touch
Hold the finished Heart Photo Holder in your hands. Imagine it adorned with love notes, creating a visual symphony of your feelings. This is your masterpiece.
Crafting Love Notes: A Heartfelt Activity for Valentine’s Day
As you wrap up your crafting session, let’s delve into another dimension of love: love notes. These are not just pieces of paper; they are expressions of your heart. Imagine the joy of creating a jar filled with tiny scrolls, each containing a heartfelt message. Picture your loved one picking a note each day, savoring your sentiments.
Conclusion: Crafted Memories and Love Beyond Measure
In a world of mass-produced items, handmade gifts stand out. They carry the warmth of the hands that created them, the time invested, and the love woven into every detail. Imagine the memories you’re creating as you craft with your loved ones, a shared experience that transcends the final product.
As you embark on this crafting journey, remember that it’s not just about the end result; it’s about the process, the shared laughter, the moments of creativity, and the love that fills the room. So, let your heart guide your hands as you craft love, one heart at a time.
Crafting love, embracing creativity, and celebrating each other.

